Convert microphone calibration files for EASERA and SysTune

Even if most of the measurement microphones already have a very linear frequency response, there are still situations in which one would like to incorporate the measurement data from the manufacturer.
It is important to have an individual file for each microphone. In the low-priced segment in particular, there is a certain spread between the microphones, even within a microphone type. Compensation is only effective if the manufacturer (or another service provider) measures each microphone individually in their laboratory and provides you with the data for your microphone.
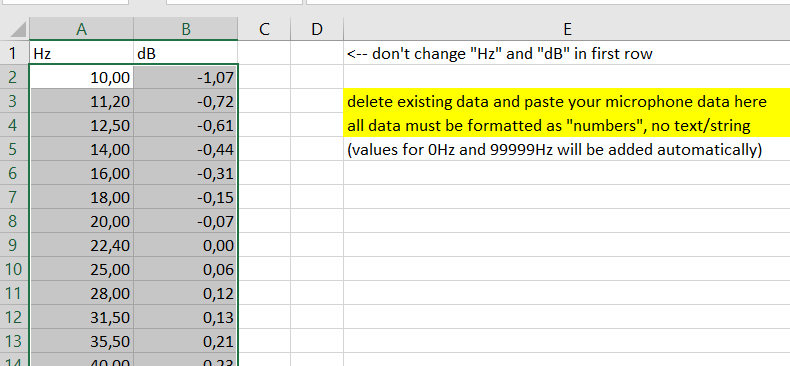
As a rule, this measurement data is enclosed as a simple text file or offered for download. This consists of a number of frequencies and the corresponding measured value in dB. You can see an extract from one of my iSEMcon EMX-7150 in the picture on the right.

Such a text file can be edited with any text editor. Most measuring programs (e.g. REW, Smaart, etc.) can read this file format and interpolate between the frequencies automatically. Depending on the software you have to rename the file extension from .txt to .cad or similar before importing.
However, there are also manufacturers who cannot do anything with this simple file format. One of them is AFMG with its two products EASERA and SysTune [Note: apparently only SysTune Pro supports importing calibration files, not the normal SysTune version]. And since I have valued and used EASERA for room acoustic measurements and evaluations for many years, it was time to finally find a way for the conversion.
If you look at a txt file and compare it with an etx file from AFMG, the different systems quickly become clear. Incidentally, an etx file can also be opened and changed with any text editor.
There are actually “only” two conversions to be carried out:
New frequency grid
Instead of 3 or 6 measuring points per octave, i.e. logarithmic as is common in audio measurement technology, AFMG requires a linear frequency grid. For example, with an FFT length of 1024 and a sampling rate of 48kHz, we have to use a grid of 48000/1024 = 46.875Hz. With an FFT length of 131072 (which corresponds to a measurement time of 2.7 seconds and is therefore more relevant in the acoustics area) we have to generate data with a frequency difference of 0.366Hz. From 0Hz up to half the sampling rate, i.e. usually up to 24000Hz.
Factors instead of dB
Second, AFMG does not want to receive the data as dB, but as a factor (multiplier). So the value 0dB has to be converted to 1, 6dB as 2, -6dB as 0.5 and so on.
Customize header
And finally we have to create a suitable header for an etx file and adjust the corresponding parameters such as sample rate and FFT size.
None of this sounds particularly complicated. But due to the sheer volume of data, this can no longer be done manually. Such a hard work calls for an Excel macro!
To save yourself the work of programming and trying out, you are welcome to use my Excel file for free. Unfortunately, OpenOffice and LibreOffice cannot run the Excel macros. Please send me a quick message and I will send you the file.
I'm already working on a standalone converter that creates etx files without Excel as a simple command line tool. Instructions will follow shortly.
Step-by-step instructions
Despite macro automation, you have to do a few things yourself to get your data into the Excel table.
[Step 0: check macro functionality]
Before you do the work and prepare everything, it is best to check whether the macro is even running on your PC. My Excel file already contains sample data and parameters to try out. With Ctrl + E you start the macro. You should then find a new etx file in yourdocuments folder. If you haven't changed the parameters, it's called EMX7150-3371910_48000_4096.etx.
Step 1: Open the txt file in Excel
First you open your text file (or csv file) with the measurement data from the manufacturer. Excel or OpenOffice usually recognize that it is a list with a tab as a separator. You may have to make a few changes in the import process so that the values for frequencies and dB are entered in two different columns.
Step 2: Format fields as numbers
Typically, Excel will view the data as text rather than a number. So we have to mark all values and format them via Format Cells… as numbers with 2 decimal places.

Step 3: replace period with comma

Since the dot (.) Is usually used for decimal numbers in a txt file, we have to convert all fields using the command Replace... (Ctrl + H). You can use the Replace all button to apply this to the entire table with one click.
Step 4: correct incorrect values
With a little luck, everything will be right. In my case, when opening it, Excel misinterpreted some fields as dates (marked in yellow). If this has also happened to you, you have to correct the incorrect values briefly by hand. It is best to take a quick look at the original txt file to find the correct values.
Then go through to the end of the list to make sure that all values are really displayed in the correct format.

Step 5: copy all values

Then mark the finished values and copy them to the clipboard (Ctrl + C). You can ignore the header.
Step 6: Open the Excel file
Now you open the Excel file with the macro (if you haven't already done so). If you see a notice regarding macros, confirm that you want to enable macros.
Step 7: insert values
There is a Mic Values table in the Excel file. The header (Hz, dB) should remain. From line 2 you insert your new values (Ctrl + V).
Step 8: adjust parameters
In the Start worksheet you will find five yellow fields. Here you select the parameters for your new etx file. For FFT size and sample rate, I have specified fields in a drop-down list so that nothing goes wrong.

You are welcome to enter your personal data in the User and Company fields. These data are stored in the etx file and can be viewed later in EASERA.
In the Mic-Type / Serialnumber field you can enter a unique name for your microphone. This field is used for the file name so that you do not mix up anything later if you have several microphones.
As mentioned above, AFMG needs a linear frequency grid, depending on the sampling rate and the FFT size. Accordingly, an etx file must be created for each data record.
You should start with the smallest FFT size (4096). This should be done on every PC within a few seconds. For larger FFTs, the calculation time is doubled per step. For 512k and 1M, it can take several minutes for Excel to calculate everything. You should only start this when the run at 4096 has worked without any problems.
Step 9: start the macro
I used the shortcut Ctrl + E for the macro. The following steps are then processed automatically:
· First of all, further data points are created in the measurement data (Mic Values table) at 0Hz and 99999Hz, if they do not yet exist. These are required for the linear interpolation.
· A new Excel document is created. The file name consists of the three parameters: name_samplerate_fft-size.etx. This is usually saved in the "Documents" folder.
· The header is written. The fields for sample rate, time samples and data are adapted to the parameters you have chosen.
· The new data is written in the appropriate frequency grid. dB values are interpolated accordingly and converted as a factor.
· The new table is saved and closed.

And your first etx file is ready!
If it worked with 4096, you can now slowly increase the FFT size. I mostly use 1.3s or 2.7s measurement times for loudspeaker measurements, i.e. FFT sizes of 65536 or 131072.
This file can already be opened with EASERA (File / Open Audio File / file type *.etx). The curve should then show your manufacturer data pretty precisely.
Systune should also be able to import the file. Please note that only the PRO version seems to support this function.

So that EASERA and SysTune use this curve as compensation for each measurement, we still have to create a corresponding reference for our measurement microphone:
Step 10 (EASERA): Set up the measurement microphone as a reference
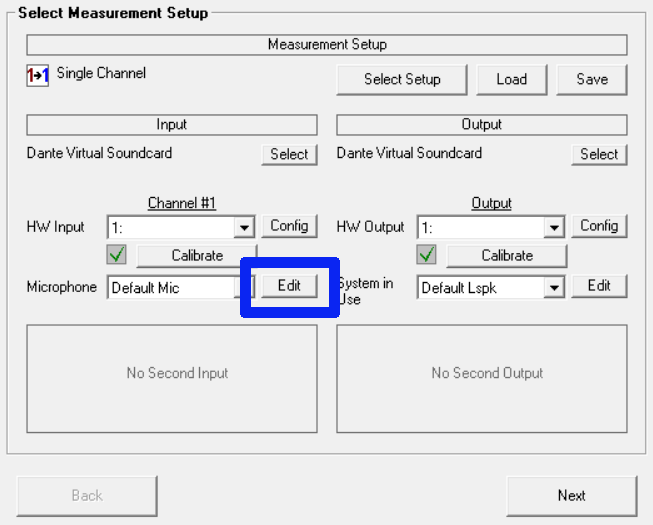
In the measurement setup, accessible via the Measure button, the Default Mic is selected by default. By clicking on the edit button, we can create additional microphones.
A click on the New button (1) creates a new microphone. It is advisable to change the name first (2). The reference files can then be added for each microphone (3). Here we first look for the appropriate folder and then select all files *. * as file format in the dropdown list.


Now we can select our etx file. The corresponding parameter combination should then appear in the list.
If you have already created several etx files for different FFT sizes, you can now add them one after the other. After clicking OK, we can now select our new microphone instead of the default mic in the previous selection window.

On the last page of the measurement setup (titled Start Measurement) we can finally decide whether or not to use frequency response correction.
This tick can only be activated if a suitable file exists for the FFT size currently in use.
By the way, EASERA creates a new mic compensation file (.efr) when adding an etx file to a microphone. You can find this in the folder Users / Public / Public Documents / EASERA10Data / References / Microphones. It is worthwhile to open this file in EASERA and compare the frequency response.

One more word about the manufacturer data: the measurement data initially provide the actual measurement results. So if a value of -1.0dB was measured in the laboratory at 100Hz, then the microphone delivers a lower level than the reference microphone at 100Hz. So that this can now be compensated for with every measurement, EASERA creates a mirrored frequency response. Instead of -1.0dB, + 1.0dB at 100Hz must be used for each measurement. Accordingly, the efr file must display values that are mirrored on the X axis compared to the previous etx file.
Step 10 (SysTune): Create a measurement microphone as a reference
The following steps must be carried out:
in the External tab, click the Plug-Ins button
in the list on the right (Launch), click on Normalization
click the Add from file button in the lower left
Select the etx file
Activate the Invert Filter function so that the frequency compensation actually compensates and does not amplify the error

Step 11: Control measurement with and without compensation
Ultimately, I would of course recommend checking whether the new frequency response correction actually does what you expect.
I simply took two measurements, once with the checkmark activated (for channel # 1 under Compensate as in the last screenshot) and once without. For comparison, SysTune has a bypass button to easily switched on and off the compensation.
Ideally, the loudspeaker and microphone are on a tripod so that the measurements do not differ apart from the correction. The differences are usually only in the range of 0.5dB. If you change other parameters such as the microphone location, these small corrections cannot be understood.

In order to counteract measurement inaccuracies, I made the measurement with 3 averages. I also selected a smoothing of 1/3 octaves.
You can clearly see that the red curve (with compensation) in the 100-200Hz range is slightly below the blue curve. And in the 2-7kHz range it is slightly above the original curve. In this respect, the result matches with the correction curves shown above and ultimately also match with the calibration data that came with my measuring microphone.
In this specific case the differences are of course marginal. For one thing, there are certainly microphones that are not quite as linear in nature. And on the other hand, there may also be situations in which one consciously strives for a correction of more than one dB, for example if your microphone has a linear frequency curve in the diffuse field and you want to use it for free field measurements or vice versa.
And the setup in EASERA is done! Admittedly, a few steps are necessary, and in particular the separate creation of etx files for each FFT setup is a bit cumbersome compared to the very simple handling of other measurement software. But as long as nothing changes in your measurement microphones, you can benefit from this small correction for years.
I hope you successfully followed the steps. If something doesn't work or you have suggestions for improving the Excel macro, I am always happy to hear from you!
Blog article: Measurement Microphone Comparison
Blog article: How to measure room modes with REW (Freeware)
Blog article: Useful switch features for Dante application