How to measure room modes with REW (freeware)
You have probably already noticed when listening to music that certain tones stand out, while others tend to perish. And if you hear the same song in different rooms, you will quickly find that the droning sounds different in each room and occurs at different frequencies. So you can't usually blame the mistake on the recording. At the latest when you listen to the same music again with headphones, you will notice that the recording itself has no major problems. The cause of the bumps in the frequency response must therefore be in your home! Welcome to the club - you are not alone!

This is exactly where I want to start today and show you a simple way to observe these bumps in your room. Because without knowing the problem it will be difficult to find a solution!
Of course, a room can also be improved by placing a few absorbers - here and there - and listening to the same music again. But this process is quite exhausting and difficult to keep track. If the absorber was expensive enough, you can quickly convince yourself that the sound has improved, although perhaps not much has changed in terms of measurements. I know this only too well!
A single measurement, however, shows you the problems of your room in seconds. On the one hand, you can read very precisely at which frequencies the room resonates. On the other hand, the measurements can be saved and compared. So you can quickly determine where in the room your absorbers are actually making an improvement.
Equipment: What you need in order to measure the room modes
A bit of equipment is of course necessary to make your current room acoustics visible:
Speaker (or subwoofer)
The oscillation of the room, in particular an acoustically almost untreated room, produces such large changes in the frequency response that any speaker is suitable for this measurement. It would be nice, of course, if the loudspeaker also reproduces low frequencies if possible. The biggest problems we have in our room or the most difficult problems to tackle are below 100Hz. I therefore only used a subwoofer (the Genelec 7350 APM*) for my measurements. If this has a low-pass filter, it should be deactivated for the measurements or set as high as possible.
Measurement microphone
As before with the loudspeaker, the following also applies here: every cheap measuring microphone is good enough for measuring room modes. By the way, I use the EMX-7150 from iSEMcon.
If you are about to purchase a new measurement microphone, then I recommend this blog article with a detailed comparison of my microphones. Abstract: a Behringer ECM8000* for around 44 USD delivers 99% the same results in terms of room modes as a microphone at 10 times the price.
If you do not have a measurement microphone, but you have a few microphones in your recording studio, try using a condenser microphone with omnidirectional characteristics (pressure receiver) due to the better linearity in the low frequency range compared to a cardioid characteristic.
Tripod
For a one-time measurement, you can certainly also attach the microphone to the wall with some adhesive tape. Or in the simplest case, you simply place the microphone on the floor. The findings regarding room modes are likely to be very similar in all corners of the room. So even without a tripod you can start right away and get a first impression of your space.
If you often take measurements, it is definitely worth buying a microphone stand. I now own eight of these Manfrotto tripods*, which I can take with me to every job in my suitcase due to their weight of less than 1kg and their small size. However, the maximum height of 1.93 m is not quite sufficient to get into the upper corners of the room with a measurement microphone. I therefore still use this 13” gooseneck *.
For occasional measurements, the tripod should of course not necessarily cost more than the measurement microphone. Common tripods like this one* do not extend into the upper corner of the room, but at least enable precise measurements at the listening spot.
Audio interface

There is an important requirement for your audio interface: it should have a microphone input with 48V phantom power. Otherwise your measuring microphone will not work. If you only purchase the interface for this purpose, then in principle a single XLR input is sufficient, such as the Focusrite Scarlett Solo* that I am using for this test right now.
Most audio interfaces will have at least two outputs anyway. We even get by with one output for measuring the room modes, to which we connect our loudspeaker or subwoofer. Make sure that you order the correct connection cable directly. Some interfaces have XLR outputs, some jack sockets. You might need two of these adapter cables for the Focusrite and maybe XLR cables like these. If you want to connect the interface with a Hifi-Receiver you might need a RCA / jack cable.
The Behringer UMC22* is priced for less than 50 USD and might be all you need if the interface is intended purely for measurement purposes. However, I have not yet tested this myself and therefore cannot make a clear recommendation.
Alternative: USB measurement microphone
If you just want to measure at home and your room is not too large, then a USB measurement microphone might be an alternative to an audio interface and an (XLR) measurement microphone. The disadvantage is the limitation of a USB cable, which is usually a few meters long. For home use this might be enough.
The microphones from miniDSP, such as the Umik-1 or Umik-2*, have become established in this area.
Measurement software
In the past few years I have tried out and purchased several software for measuring loudspeaker systems. And of course I also compared the measurement curves with each other quite often. Ultimately, they show pretty much the same thing if you set the parameters the same.
My mission is that everyone can acquire the opportunities and knowledge they need to optimize their system and space. And after I have also dealt with the freeware REW (Room EQ Wizard), I can fully recommend it for all measurements in the area of room acoustics.
All in all, the equipment costs less than EUR 100, even if you have neither a measuring microphone nor an audio interface. I do not count the loudspeaker here, because you will need or already own it if you want to listen to music!
The Measurement Setup
Speaker
We would certainly recognize the weaknesses of the room if we left the speaker where it is. At the beginning, however, it is advantageous if we place the speaker in a corner on the floor. Because there it stimulates all room modes equally. When the speaker is in the middle of the room, some modes are excited and others may not or only weakly. In order to get to know your room well, I would recommend that you put the speaker in the corner at least once for an initial measurement as a reference.
The measurement should only be carried out with one loudspeaker. We therefore only use one of the outputs from the audio interface. If your speaker or receiver has an EQ or some kind of intelligent room adjustment, you should deactivate it for the measurements. As already mentioned, you should also deactivate the low pass or set it to a high frequency (100 Hz or higher) when using only a subwoofer. My Genelec subwoofer unfortunately allows a maximum of 100 Hz for the low pass and therefore of course only data up to 100 Hz are included in the measurement diagrams .


Measuring microphone
We position the microphone in the opposite corner of the room. If your loudspeaker is on the floor in the front left corner, then the microphone should be on the ceiling on the right rear!
One measurement position is usually sufficient for symmetrical rooms. But it doesn't hurt if you repeat the whole thing in another corner. Because of the speaker cables, it's probably easiest to take the front right corner. The microphone moves accordingly to the corner at the top rear left.
The measurement
REW is free, but it is still a mature software. The setting options are correspondingly extensive in order to offer experienced users all the options that could be needed depending on the situation.
I will not be able to explain every step due to the complexity. But I would like to try to show you the most important steps and to get you started with room acoustic measurements as easy as possible.
Incidentally, I use REW on Mac OS. It should run on Windows as well. You can download the software here for free: Room EQ Wizard.
I will not comment further on the installation process of the software and the audio interface, since it looks different to everyone and hopefully is self-explanatory.
Preferences
The most important (and for the time being the only) step in the settings is the selection of the audio interface. You can access the menu via the Preferences button at the top right.

Even if you have already defined your audio interface as the standard interface in the operating system (which I do not recommend because error messages and the like sometimes generate very loud noises through your speakers), I would in REW under Output Device or Input Device explicitly select the interface you want to use for the measurement. Whether you use 44.1kHz or 48kHz is not relevant for our purposes. However, you should check that your audio interface is set to the same sampling rate.
Output should be set to L, because the signal should go to the speaker via the first output (L).
With Input you select the input to which you have connected the measuring microphone, so probably L or 1.
Ultimately, you still have to adjust the output sweep level. If you have an active studio speaker connected directly to the audio interface, you should start at around -40dBFS and increase slowly if necessary. If you have connected a receiver between the interface and the speaker, -40dBFS will be clearly too quiet. With the button Check Levels... you have the possibility to generate a noise and to check the signal chain and volume.
It is important to choose the correct option for your situation at levels. If you are using a normal speaker, then you should select Use main speaker test signal. And if you only use one subwoofer, then Use subwoofer test signal should be set. REW cuts off the test signal below 100Hz in main speaker mode, so that with the wrong combination of speaker and mode, we will hear little or nothing.
It is not necessary and not possible without a calibrator to maintain a specific level for the measurement. However, the signal should not be too quiet. Because we are looking at the decay of the signal in space. Depending on the level of noise in the room, it is advantageous if we set the sweep quite loud.
If we have successfully switched the signal to the speaker and set the output volume, we still have to adjust the input level of the microphone on the audio interface. I would aim roughly -18dBFS with the measurement signal running, as suggested by REW, so that we have enough reserves and not overdrive the input.
That should have been the attitude. So directly to practice!
The first measurement
With the button Measure you get to the dialog for the measurement. Since we are currently not interested in a calibration in dBSPL, you can safely skip the warning "SPL not calibrated" with the button Continue anyway.

Based on the screenshot you can see which settings I used to create my measurements. Here are the most important points:
Name: since we sometimes do comparative measurements from different positions and different absorber locations, you should get used to assigning clear names from the start. Only a few characters will be visible in the list later. I therefore use abbreviations such as BL (bottom left), TR (top right); first the source (i.e. the speaker location), then the destination (the location of the measurement microphone). Then I always write a short comment on the acoustic situation, e.g. empty (i.e. without absorber), full (with all absorbers) or other distinctions (e.g. window open, door open).
Range: I use the frequency range from 10Hz to 20,000Hz. If you later carry out many comparative measurements from different absorber locations or speaker positions and you are actually only interested in the deep room modes, you can of course reduce the range to 10Hz to 200Hz. This protects your ears and your neighbors don't worry about the siren sounds!
Settings: the smallest value of 128k means a sweep length of 2.7 seconds. This should be more than sufficient for most rooms. Nevertheless, it is advisable to increase the length of the measurement. Because every time the length is doubled, we get an approximately 3 dB better signal-to-noise ratio. I mostly use 512k because occasionally cars can be heard in the background. And 12 seconds are well invested here for measurements that are as clean as possible.
In theory, increasing the repetitions brings the same effect: with every doubling, there is 3dB less noise. However, this effect only worked occasionally for me with REW, whereas the lengthening always brought an improvement.
Timing: since we have not wired a reference signal, I use no timing reference.
Once all settings have been made, you can carry out your first measurement using the Start button! Keep an eye on the large headroom display during the measurement. In the best case, the levels are fine and your headroom is in the 10-15dB range. If the measurement is overdriven, you have to lower the microphone level a bit and do it all over again.
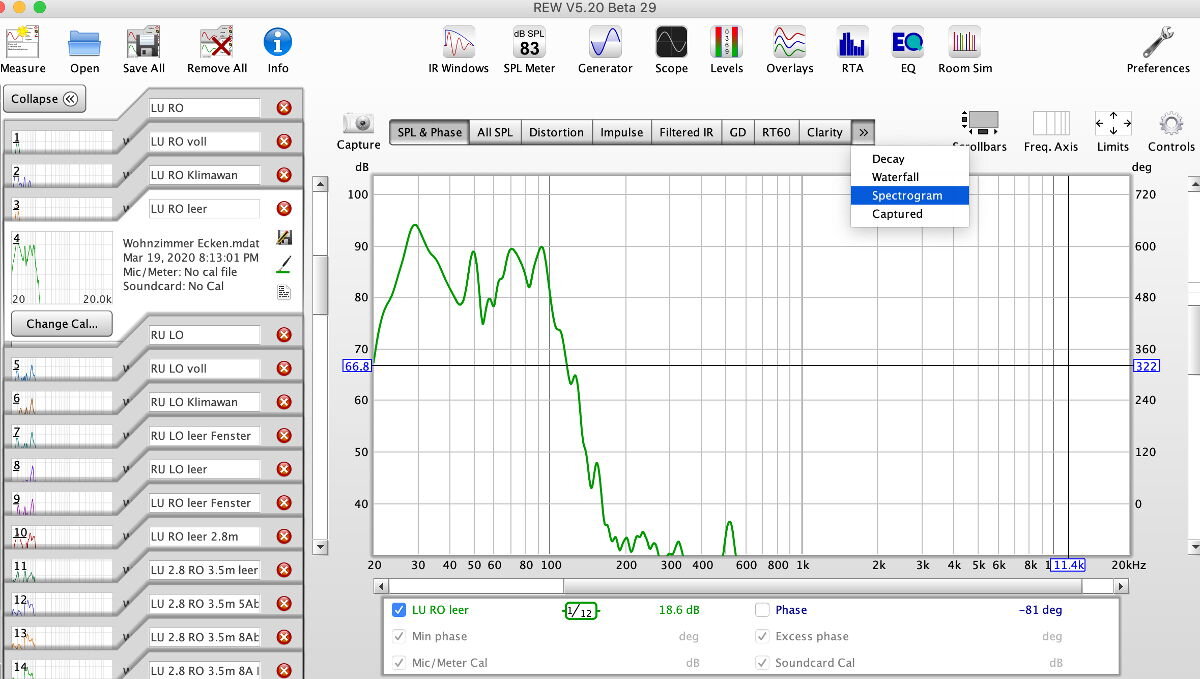
The Spectrogram
After the measurement, REW first shows us the frequency response. It shouldn't worry us that it doesn't look straight. We deliberately chose the worst positions for our loudspeaker and our microphone so that we can capture as many of the "bad influences" in our room as possible and make them visible. The so-called Spectrogram is much more meaningful with regard to the room modes. You will find it as the third option in the selection menu hidden with two small >> arrows (see screenshot above).
Since we are primarily interested in low-frequency reverberation, we can adjust the frequency range accordingly, e.g. to 10..200Hz with the button at the bottom right. This can be set even more precisely using the Limits button.
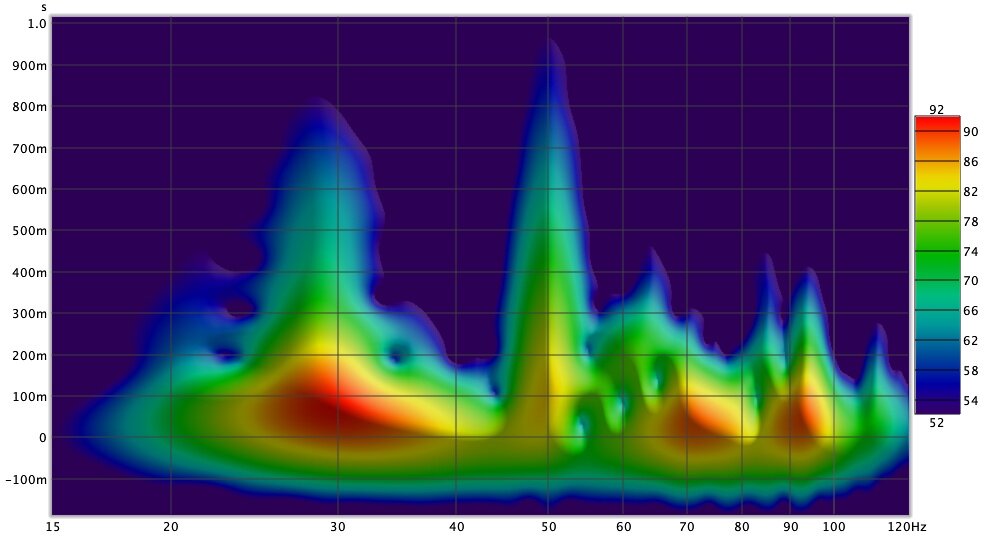
Two large room modes clearly stand out in my case, at 28Hz and at 50Hz. While most frequencies have dropped by 30dB after 300ms, these two modes need around 900ms.
Since the term reverberation time comes up occasionally: this is by definition the time of the level drop by 60dB, also called RT60. REW initially selects other presets for the Spectogram. In my diagram you can see the drop above 40dB (92dB to 52dB). The reverberation time RT60 is therefore significantly longer.
Waterfall
There is another diagram that is often used in connection with room modes and the decay behavior of rooms: the waterfall diagram.

It looks a bit more impressive, but from my point of view hardly offers any additional information compared to the Spectogram. Ultimately, it is the same data. In one case the level is shown as height (therefore 3D), in the other case as color.
Due to the oblique angle of the waterfall diagram, it is also not that easy to read the exact frequencies. For this reason, I personally prefer the spectogram.
When you have arrived at this point, congratulations on the first measurement of your room acoustics! To be able to access your measurements at any time later, you should save them using the Save All button. And using the Capture button, the spectogram can be conveniently saved as a JPG graphic if you want to send it to a friend or post it on social networks!
Comparison measurement at normal listening position
Even if the positions just used in the corners are well suited to show all the oscillations of your room, you may still be interested in how the situation looks like at the position where you normally listen to music. Likewise, the speaker position in the corner is of course disadvantageous for listening to music.
If you are already there, you should move your speakers back to their usual position and place the measuring microphone where you normally have your ears when listening to music. It makes sense that you take two more measurements, one for the left speaker and one for the right speaker individually.
The frequencies of the prominent room modes are probably very similar to the first measurement in the corner of the room. But you may get another perspective here. If you are still flexible with regard to speaker and listening position, you should rather go after the measurement in the corner and improve the room as a whole. If for some reason you are already determined with the positions, then you can rather orient yourself after the measurement at this specific point and concentrate only on the problems actually occurring there.
Measures against room modes
Even if this article was used to measure the modes and shows you a way to disclose the room acoustic problems, I would still like to briefly outline the next three steps:
Classification of the measurement results in spatial geometry
Every metrological abnormality naturally has its physical cause. So that we can take measures to combat a mode, we first have to find out between which walls the measured oscillation occurs.
Fortunately, there are also many free tools for this, such as amroc.
Using my room dimensions (690 x 344 x 295cm) you see a first connection between the diagram and the geometry. Unfortunately my living room is not completely rectangular, but has a 10m long corridor. There are two possible causes for the clear 50Hz mode: either Mode 2-0-0 (2nd order of 690cm) or 0-1-0 (1st order of 344cm). [And unfortunately the 3-0-0 mode of the 1000cm corridor with 51Hz is also in this range.]
I have to say at this point that my room was not completely empty. I have all cleared the mobile absorbers into the next room, but I kept the ceiling clouds. For this reason there is no 0-0-1 room mode (between ceiling and floor) at 58Hz visible in the Spectogram. The ceiling clouds have already done a good job dampening this mode!
The more rectangular and symmetrical your room looks, the more clearly your measurement results can be assigned to the room geometry.
A little tip: You can quickly check whether a wall is involved in fashion without an absorber by opening a window or a door on the respective wall (see next Spectrogram). For example, in my case both lower modes almost disappeared as soon as I opened the large window front. So it is clear to me that my main focus should be on cladding the wall behind the speakers.

Dimensioning of suitable absorbers
If we now know through the measurement the frequencies that we should dampen and also know through the geometry which wall we have to place our absorbers to dampen this mode, we can design our absorbers.
The big questions for this are: which principle (porous absorber, Helmholtz absorber or plate absorber), which material (and with which density or with which flow resistance) and which absorber depth.
In my blog article on various materials for broadband absorbers, I have already discussed several examples of absorber depths and their degree of absorption at low frequencies for porous absorbers.
My 50Hz room mode can be dampened just with 40cm absorber depth if you cover the whole wall. At 28Hz, however, the effectiveness is no longer as good. So I will either always have to open the windows to listen to music - which is not always the best idea, depending on the weather and my desired listening volume! Or - and that's what it looks like - I transform my porous absorbers into Helmholtz absorbers that reach much deeper with the same absorber depth.
Whatever ideas you have to improve your room modes, by measuring again with REW you can compare wonderfully whether a measure brings an improvement! And you can of course leave the speakers in their actual position in the further process. It is only important that you change only one parameter when comparing. So either leave the speaker unchanged and experiment with absorbers, or leave the absorbers unchanged and compare different speaker positions. If you change several parameters at the same time, it will be difficult to find out which measure actually caused the improvement (or deterioration).
I hope I was able to motivate you with my little guide to REW to measure the peculiarities of your own space. Because the better you know the challenges, the better you can determine measures to solve them!
I wish you lots of fun trying it out and good luck for the next steps on the way to perfect sound in your living room or recording studio!
Blog article: 5 tips for better room acoustic measurements
Blog article: Rock wool, glass wool, hemp - which material is best suited for absorbers?
Blog article: Measurement Microphone Comparison Test
* Affiliate link